You must have seen many times, there are many websites and blogs in which we get to see the preloader at the time of page loading.
Preloader is helpful in making your blog look attractive and stylish.
If you also want to add preloader to your Blogger / Blogspot, then stay in this article in which you will be able to know how you can add preloader to your blogger, So let's start
How to Add Preloader For Blogger / Blogspot
To add a Full stylish responsive preloader to your blogger, you can make a good preloader for your blogger by following the steps given below.
First Preloader
#Step1: First Login to your Blogger Account.
(Your Blogger Dashboard will open in front of you).
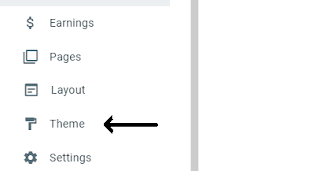
#Step2: Now Click on the Theme.
#Step3: Then Click on Customize and click on Edit HTML.
#Step4: (Now HTML Code Editor will open in front of you). In which you Click and Press Ctrl + F from your keyboard.
#Step5: Find more </head>.
#Step6: Paste the below given CSS over </head>.
<style>
div#preloader {
margin: auto;
position: fixed;
width: 100%;
height: 100%;
background-color: #fff;
z-index: 9999999;
display: flex;
align-content: center;
justify-content: center;
}
.loader {
top: 50%;
left: 50%;
margin-left: -25px;
margin-top: -25px;
width: 50px;
height: 50px;
position: absolute;
-webkit-transform: rotateZ(45deg);
transform: rotateZ(45deg);
}
.loader .Color-cube {
float: left;
width: 50%;
height: 50%;
position: relative;
-webkit-transform: scale(1.1);
-ms-transform: scale(1.1);
transform: scale(1.1);
}
.loader .Color-cube2 {
-webkit-transform: scale(1.1) rotateZ(90deg);
transform: scale(1.1) rotateZ(90deg);
}
.loader .Color-cube4 {
-webkit-transform: scale(1.1) rotateZ(270deg);
transform: scale(1.1) rotateZ(270deg);
}
.loader .Color-cube3 {
-webkit-transform: scale(1.1) rotateZ(180deg);
transform: scale(1.1) rotateZ(180deg);
}
.loader .Color-cube:before {
content: '';
position: absolute;
top: 0;
left: 0;
width: 100%;
height: 100%;
-webkit-animation: cube-loading 2.4s infinite linear both;
animation: cube-loading 2.4s infinite linear both;
-webkit-transform-origin: 100% 100%;
-ms-transform-origin: 100% 100%;
transform-origin: 100% 100%;
background: #ffb606;
}
.loader .Color-cube2:before {
-webkit-animation-delay: .3s;
animation-delay: .3s;
}
.loader .Color-cube4:before {
-webkit-animation-delay: .9s;
animation-delay: .9s;
}
.loader .Color-cube3:before {
-webkit-animation-delay: .6s;
animation-delay: .6s;
}
@keyframes cube-loading{0%,10%{-webkit-transform:perspective(140px) rotateX(-180deg);
transform:perspective(140px) rotateX(-180deg);opacity:0}25%,75%{-webkit-transform:perspective(140px) rotateX(0);
transform:perspective(140px) rotateX(0);
opacity:1}100%,90%{-webkit-transform:perspective(140px) rotateY(180deg);
transform:perspective(140px) rotateY(180deg);opacity:0}}
</style>
#Step 7: Now find the <body> and paste the code below the <body> tag.
<div id='preloader'>
<div class='loader'>
<div class='Color-cube1 Color-cube'></div>
<div class='Color-cube2 Color-cube'></div>
<div class='Color-cube4 Color-cube'></div>
<div class='Color-cube3 Color-cube'></div>
</div>
</div>
#Step 8: Paste the code below on where your body tag is being closed.
For this,you find </body> and paste the below code above the </body> tag.
<script type='text/javascript'>
setTimeout(function(){
$('#preloader').fadeOut();
$('.preloader_img').delay(0).fadeOut('fast');
}, 10000);
</script>
Also Read: Recent Posts Widget With Thumbnails For Blogger
Second Preloader
<style>
div#preloader {
margin: auto;
position: fixed;
width: 100%;
height: 100%;
background-color: #000;
z-index: 9999999;
display: flex;
align-content: center;
justify-content: center;
}
.loader {
top: 50%;
left: 50%;
margin-left: -25px;
margin-top: -25px;
width: 50px;
height: 50px;
position: absolute;
-webkit-transform: rotateZ(45deg);
transform: rotateZ(45deg);
}
.loader .Color-cube {
float: left;
width: 50%;
height: 50%;
position: relative;
-webkit-transform: scale(1.1);
-ms-transform: scale(1.1);
transform: scale(1.1);
}
.loader .Color-cube2 {
-webkit-transform: scale(1.1) rotateZ(90deg);
transform: scale(1.1) rotateZ(90deg);
}
.loader .Color-cube4 {
-webkit-transform: scale(1.1) rotateZ(270deg);
transform: scale(1.1) rotateZ(270deg);
}
.loader .Color-cube3 {
-webkit-transform: scale(1.1) rotateZ(180deg);
transform: scale(1.1) rotateZ(180deg);
}
.loader .Color-cube:before {
content: '';
position: absolute;
top: 0;
left: 0;
width: 100%;
height: 100%;
-webkit-animation: cube-loading 2.4s infinite linear both;
animation: cube-loading 2.4s infinite linear both;
-webkit-transform-origin: 100% 100%;
-ms-transform-origin: 100% 100%;
transform-origin: 100% 100%;
background: #fff;
}
.loader .Color-cube2:before {
-webkit-animation-delay: .3s;
animation-delay: .3s;
}
.loader .Color-cube4:before {
-webkit-animation-delay: .9s;
animation-delay: .9s;
}
.loader .Color-cube3:before {
-webkit-animation-delay: .6s;
animation-delay: .6s;
}
@keyframes cube-loading{0%,10%{-webkit-transform:perspective(140px) rotateX(-180deg);
transform:perspective(140px) rotateX(-180deg);opacity:0}25%,75%{-webkit-transform:perspective(140px) rotateX(0);
transform:perspective(140px) rotateX(0);
opacity:1}100%,90%{-webkit-transform:perspective(140px) rotateY(180deg);
transform:perspective(140px) rotateY(180deg);opacity:0}}
</style>
If you use the second preloader, then do not paste the CSS of the first preloader use the second preloader CSS
If you use this preloader and you get any kind of error or problem
So after commenting, I will definitely resolve it.
Also Read: Featured Posts Widget For Blogger
Also Read: How to Create Backlinks Step By Step
Also Read: Blogger SEO: A Complete Guide


0 Comments