Hello guys! In today's article, you will know how to add a table in blogger posts.
Because the normal table is used in every post.
But No plugin is used in Blogger. So we have to add any code custom. So looking at it. We will tell you about some such stylish and responsive tables.
How to Add Table In Blogger Post
You remained with us in this article. How do you create a table in a blogger post? All the information related to table creation will be found in this article. So let's start.
Below you are shown several types of tables. You can use the table you want to use. Follow the steps mentioned to use them.
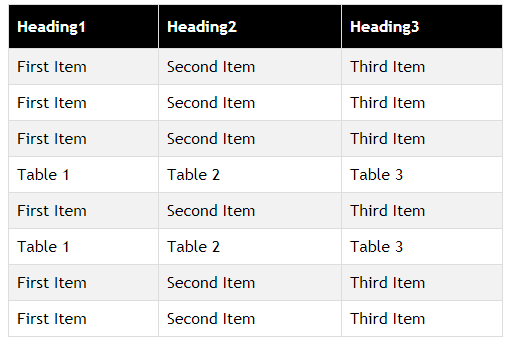
Table 1 (Black Table)
#Step 1: Open your Blogger Dashboard.
#Step 2: Now you click on the Theme.
#Step 3: Then you click on Edit Html.
The code editor will open in front of you.
#Step 4: You click on the code. Press Ctrl + F from your keyboard.
#Step 5: And Find </head> .
#Step 6: Now paste the below-given CSS over the <head>.
<style>
#table_Style
{
font-family: "Trebuchet MS", Arial, Helvetica, sans-serif;
border-collapse: collapse;
width: 100%;}
#table_Style td, #table_Style th
{border: 1px solid #ddd;
padding: 8px;
}
#table_Style tr: nth-child (even)
{
background-color: # f2f2f2;
}
#table_Style tr: hover
{
background-color: #ddd; }
#table_Style th
{padding-top: 12px; text-align: left; background-color: # 000; color: white; padding-bottom: 12px; } </style>
#Step 7: Click on save.
You have to do this work only once.
#Step 8: Whenever you want to use the table. Then go to the HTML view of your post and paste the below code.
<table id = "table_Style">
<tr>
<th> Heading1 </th>
<th> Heading2 </th>
<th> Heading3 </th>
</tr>
<tr>
<td> First Item </td>
<td> Second Item </td>
<td> Third Item </td>
</tr>
<tr>
<td> First Item </td>
<td> Second Item </td>
<td> Third Item </td>
</tr>
<tr>
<td> First Item </td>
<td> Second Item </td>
<td> Third Item </td>
</tr>
<tr>
<td> Table 1 </td>
<td> Table 2 </td>
<td> Table 3 </td>
</tr>
<tr>
<td> First Item </td>
<td> Second Item </td>
<td> Third Item </td>
</tr>
</table>
</body>
</html>
Now you open the Compose View. Now your table will be created in front of you.
You can add the content of your table according to your choice.
Table 2 (Blue&White Table)
If you want to add this table in your blogger post. So you can use this table by following the process shown above.
In which you have to paste the below-given CSS over the <head>.
<style>
#table_Style
{
font-family: "Trebuchet MS", Arial, Helvetica, sans-serif;
border-collapse: collapse;
width: 100%;}
#table_Style td, #table_Style th
{border: 1px solid #fff;
padding: 8px;
}
#table_Style tr: nth-child (even)
{
background-color: # eae8e8;
}
#table_Style tr: hover
{
background-color: #ddd; }
#table_Style th
{padding-top: 12px; text-align: left; background-color: # 00e7ff; color: black; padding-bottom: 12px; } </style>
And you have to paste this code in the HTML view of your post.
<table id = "table_Style">
<tr>
<th> Heading1 </th>
<th> Heading2 </th>
<th> Heading3 </th>
</tr>
<tr>
<td> First Item </td>
<td> Second Item </td>
<td> Third Item </td>
</tr>
<tr>
<td> First Item </td>
<td> Second Item </td>
<td> Third Item </td>
</tr>
<tr>
<td> First Item </td>
<td> Second Item </td>
<td> Third Item </td>
</tr>
<tr>
<td> Table 1 </td>
<td> Table 2 </td>
<td> Table 3 </td>
</tr>
<tr>
<td> First Item </td>
<td> Second Item </td>
<td> Third Item </td>
</tr>
</table>
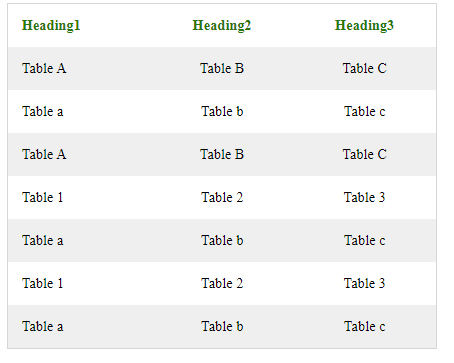
Table 3 (Transprate Table)
If you like this table. Then follow the same procedure as in Table 1.
In which you have to paste the below-given CSS over the <head>.
<style>
table {
border-collapse: collapse;
border-spacing: 0;
width: 80%;
border: 0.8px solid # d8d5d5;
}
th, td {
text-align: center;
padding: 15px;
}
th {
color: # 287707;
}
th: first-child, td: first-child
{
text-align: left;
}
tr: nth-child (even) {
background-color: #efefef;
}
</style>
And you have to paste this code in the HTML view of your post.
<table>
<tr>
<th> Heading1 </th>
<th> Heading2 </th>
<th> Heading3 </th>
</tr>
<tr>
<td> Table A </td>
<td> Table B </td>
<td> Table C </td>
</tr>
<tr>
<td> Table a </td>
<td> Table b </td>
<td> Table c </td>
</tr>
<tr>
<td> Table A </td>
<td> Table B </td>
<td> Table C </td>
</tr>
<tr>
<td> Table 1 </td>
<td> Table 2 </td>
<td> Table 3 </td>
</tr>
<tr>
<td> Table a </td>
<td> Table b </td>
<td> Table c </td>
</tr>
<tr>
<td> Table 1 </td>
<td> Table 2 </td>
<td> Table 3 </td>
</tr>
<tr>
<td> Table a </td>
<td> Table b </td>
<td> Table c </td>
</tr>
</table>
You can use any of these tables. All these tables are responsive.
The way to do table 2 and table 3 is the same as table 1.
Suggestion
If you want to use the type of table in your blog, you can do it. You have to follow all the steps.
All these tables are responsive. So it is friendly for both desktop and mobile.
If you have any kind of error or problem. So you can tell us by commenting.


3 Comments
Thanks for splitting your comprehension with us. It’s really useful to me & I hope it helps the
ReplyDeletepeople who in need of this vital information.
Best office chairs in chennai
Hello.
ReplyDeleteThanks for sharing this html table codes for blogger blog users.
Mee too i am in need of one, and i find this on your blog.
Thanks, 📝 Abba Abdullahi Garba.
Pretty good post. I just stumbled upon your blog and wanted to say that I have really enjoyed reading your blog posts. Any way I'll be subscribing to your feed and I hope you post again soon. Big thanks for the useful info. rapidgator premium link generator
ReplyDelete